- Generate the Personal Profile Export Report (in Volunteer Impact)
- Go to: Reports, then click on “Personal Profile Raw Data” found in the sidebar under General Reports
- Search for the desired profiles.
- Select the fields you need for your badges in Basic Export Columns:
- Name Fields: “First Name”, “Last Name”, etc.
- Mics Fields: “TimeclockQRCodeUrl”
- In the “Other Settings”, select either XLSX or XLS as the file format
- Click the [Export Profiles] button
- Create Badge / Nametag Template (in Microsoft Word)
Before beginning the Mail Merge operation, open Microsoft Word to create or modify the template you wish to use. You can take advantage of Microsoft Word’s list of labels, badges and nametag templates available. Here are a couple templates you can work with in preparing your badges:
- Step 3: Mail Merge (in Microsoft Word)
- Save the file as a Word document (.DOC or .DOCX).
- Select the “Mailings” tab in the ribbon.

- Click on Select Recipients >> Use an Existing List.

- Locate the Personal Profile raw data report you generated and click “Open”.

- A pop-up window may be displayed. Click “Yes” to trust the source.
- Another pop-up window may be displayed. Leave everything as is and click “Ok”.
- To set the maximum height and width dimensions of the QR code images inside each badge, click on the “Insert” tab and insert a “1×1” table. Click on your table and drag to set the desired size.

*IF YOU ARE UNABLE TO SELECT YOUR TABLE:
Right click on the badge template and select “More Layout Options” (“Format AutoShape” on a PC).

Click on the “Text Wrapping” tab (“Layout” tab on a PC), and click “Behind text”, and then click “Ok”.

Click on your table and drag to set the desired size.

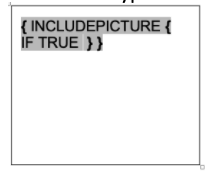
- Set your cursor in the table you created and press:
- Control F9 on a PC OR
- Command F9 on a Mac (if standard function keys are enabled) OR
- Command + fn F9 on a Mac (if standard function keys are NOT enabled)

- Type “includepicture” followed by a space.

- Press:
- Control F9 on a PC OR
- Command F9 on a Mac (if standard function keys are enabled) OR
- Command + fn F9 on a Mac (if standard function keys are NOT enabled)
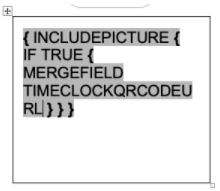
- and type IF TRUE and then a space.

- Press:
- Control F9 on a PC OR
- Command F9 on a Mac (if standard function keys are enabled) OR
- Command + fn F9 on a Mac (if standard function keys are NOT enabled)
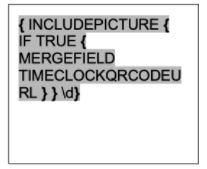
And type MERGEFIELD, then a space and then the name of the field identifier ( column) you used in your Excel spreadsheet created above. Use TIMECLOCKQRCODEURL if you did not change the default name.

- Cursor across to just before the last nested curly bracket and type \d.

- For all other merge fields, simply place your cursor in the location you want the field data to appear, select “Insert Merge Field” (from the Mailings menu) >> FirstName (for example) to insert the merge field.


- When you are satisfied with the placement of your merge fields, go to the ‘Mailings’ tab, select “Finish & Merge”, and “Edit Individual Documents” to view your mail merge prior to printing, leave the selection as “All” and click “Ok”.

- When you generate your merge document, you may notice that some of the merge fields, including the QR code have not been updated and do not display the data, or you may see an error message. To fix this, highlight the entire document (Shortcut is CTRL + A), and press F9 (or fn F9). This will update all your fields.

Further information about creating QR code badges may be found online using this link.

